Saturday, 8 December 2012

Ferrero Rocher Cupcakes


The best part about coming home for the holidays is without a doubt that I don't have to cook, rarely have to clean and my parents pay for groceries. While I should be studying for my exams, I couldn't help but take advantage of this and bake some delicious cupcakes that are both festive and expensive.

When I first came across these cupcakes on the internet I couldn't get over how cute the gold wrappers looked on the cupcakes with the Ferrero Rocher on top. And while I couldn't find on specific recipe that was practical and fit my vision I took inspiration from here and here to achieve it.


Dark Chocolate Cupcakes (makes approx. 12)
Ingredients:
1 cup sugar
7/8 cup flour
3/8 cup dutch processed cocoa 
3/4 teaspoon baking soda
3/4 teaspoon baking powder
1/2 teaspoon salt
1 egg
1/2 cup buttermilk (I substituted 1/2 2% milk with a teaspoon of cream of tartar rather than buy a whole carton of buttermilk)
1/4 cup vegetable oil
2 ounces bittersweet chocolate
1/3 cup boiling water


Directions:
In large bowl mix together sugar, flour, cocoa, baking soda, powder, and salt and combined. (Sift if any ingredients have gotten lumpy)

Melt chocolate in the microwave, taking it out every 30 seconds and stirring.

Keeping the mixer on low add egg, milk, oil and chocolate. Add each individually, until fully incorporated, scraping down the sides between each additions.

Add boiling water and stir by hand until fully incorporated.

Fill muffin tins 3/4 full and bake for about 20 minutes at 350 degrees.

Remove from tins and cool on a drying rack.


Nutella Buttercream Frosting (enough to pipe swirls on 12 cupcakes)
Ingredients:
1/2 a 375g container of Nutella (or half 13 ounces)
1/2 cup unsalted butter
1/2 bag of icing sugar (or about 2 cups)
1/2 teaspoon vanilla
whipping (heavy) cream as needed
Ferrero Rochers for toppers

Directions:
Mix butter and Nutella together until combined.

Add icing a cup at a time. The texture of the icing will be like sand after this.

Add vanilla. Add whipping cream one teaspoon at a time until the desired consistency is reached. 


Pipe and top with chocolates.

Monday, 3 December 2012

Royal Icing Transfer Tutorial and Oxfam Cookies


So now we're into December, the month of baking and exams. And while we're all trying to learn what exactly was going on in those lectures we've been "going to" all term, we can also learn a few new techniques when it comes to our holiday baking.

I'm sure everyone has come across a cookie or some other icing decoration and thought, how could someone possibly have made that so perfect? Well, if that person had a few hundred bucks to throw around, they could have used a projector designed specifically for baking to trace the design, or they could have made transfers traced onto wax paper. 


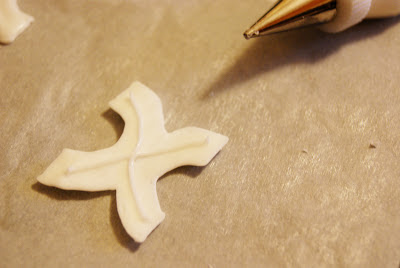
The process of making royal icing transfers is quite simple, however because icing is not the strongest of mediums, I recommend making many back-ups as they will break.

What you need:
-soft peak icing 
-flood icing
-piping bag with a number 2 tip
-squeeze bottles

To begin, grease a sheet of wax or parchment paper with butter.

Under the wax paper place an image of what you trying to create. The technique works best with simple images like logos and lettering. An image with layers such as eyes on a person or animal will be more difficult to trace.

Pipe outlines of the image. 


It's best to begin flooding the transfers before the piping dries. This will reduce the chance of the piping breaking.


After a few hours the transfers may seem dry but believe me when I say they won't come of the paper clean until they've dried overnight. 


After drying overnight, gently slide them off the paper with a small off-set spatula or pry them off even more gently with a knife.

Pipe the backs with royal icing and secure them to your cookie.


Tuesday, 27 November 2012

Snickerdoodle Cupcakes


Like every school year ever and like every student ever, I've fallen into the November slump. And while despite the the forever cramming for midterms in October ending, November means its cold and I need to save my motivation for final exams. That sounds fair right?

Well thanks to my friend, I actually got around to baking again and surprise, surprise, it's a cupcake. I keep thinking it's about time I stop baking cupcakes and start baking more of a variety of sweets but in all honesty cupcakes are such a crowd-pleaser and I don't bake for myself, I bake for my friends.

So my friend Katie picked out a recipe, which I happened to own from Martha Stewart, for snickerdoodle cupcakes and being the kind souls that we are, we gave them out to our friends and performers at a coffeehouse that we helped organize.


Snickerdoodle Cupcakes (makes approx. 30)
Ingredients:
3 cups minus 2 tablespoons all purpose flour
1 tablespoon baking powder
1/2 teaspoon salt
1 tablespoon ground cinnamon
1 cup unsalted butter
4 large eggs
1 3/4 cups sugar
2 teaspoons vanilla extract
1 1/4 cup milk

Directions:
Preheat oven to 350 degrees and line your muffin tins.

Sift together dry ingredients in a medium bowl and set aside.

Cream butter and sugar together until pale and fluffy with a mixer on medium speed in a larger bowl. Add the eggs one at time, mixing until completely incorporated. Add vanilla. Add the dry ingredients in three batched alternating with milk and making sure to scrape down the sides of the bowl so everything is well incorporated. 

Fill the cupcake liners 3/4 full and bake for 20 minutes. When cooled frost with your favourite buttercream or cream cheese frosting.

Notes: Baking in student housing, as I'm sure I've said before, means the ovens usually have a mind of their own. Despite baking at a lower temperature than 350 I found the first batch came out with a stiff top but the insides were still light and fluffy. Not only is this recipe a keeper, I think it may also be foolproof.   


Sunday, 14 October 2012

Pie Time!


Now that fall is finally here and the weather is cold enough to make you contemplate getting out your winter coat, it is time for fall baking! Which means while everyone is baking "pumpkin spice" everything, I was trying out pies (not pumpkin pies) for the first time. 

The idea seemed simple enough which was to buy pie crust and raspberry jam and cookie sticks, combine and bake. Actually, it seemed fool proof and they looked beautiful going into the oven. The problem took place in the oven where the pies went from "thanksgiving" to "halloween". I'm not sure if it was because the vents I cut weren't big enough or if it had to do with the sticks, but in the oven the pie crusts separated and oozed jam everywhere which made it look like a bloody mess.


Thankfully some of them came out clean like the one bellow and regardless of the appearance they were tasty. And since this blog has become more unsuccessful than successful in my baking pursuits, I'll be making sure to put up some good, classic recipes that were also brought to our thanksgiving feast.


Saturday, 29 September 2012

Black-Bottom Cupcakes


Since moving back to school, starting classes and then catching a terrible cold that originated in Georgia (the state, not the country), I've had little to blog about. I did have a previous blog from the end of August when I made the most delicious and moist vegan mini-cupcakes ever but before I could write the blog post my memory card deleted all the photos and then the memory card was lost forever (karma's a bitch and it doesn't distinguish between people and memory devices). But today I took all my baking supplies on the long trek to the campus ghetto to bake at my friends' house. Carrying my cupcake carrier, camera bag and a massive bag filled with canisters, a mixer and every other ingredient for half an hour resulted in quite a few rests along the way and my friend saying, "You look like you're about to cry." So we went to McDonald's to cheer me up.


For the recipe this week I returned to The Hummingbird Bakery Cookbook for their Black-Bottom Cupcake recipe. The final product was delicious but not quite a cupcake and I wish it had been better described in the recipe especially the consistencies, none of which seemed accurate while mixing. The "black-bottom" was called a cake filling but never reached a consistency of cake batter (actually the thickest 'goop' I've ever come across) and tasted more like a brownie after being backed. Alternatively, the cheesecake batter was a liquid mess. 


Black-Bottom Cupcakes (makes a dozen)

Ingredients:
Cake Base (Brownie)
1 1/2 cups all-purpose flour
1/2 + tablespoon sugar
 1/3 cup unsweetened cocoa powder
1/2 teaspoon baking soda
1/4 cup sunflower oil (I used vegetable oil)
1 1/2 teaspoons distilled white vinegar
1/2 teaspoon vanilla extract
Cheesecake Filling
4 1/2 oz. cream cheese
1/3 cup sugar
1 egg
1/2 teaspoon vanilla extract
a pinch of salt
2/3 cup chocolate chips


Directions for chocolate base:
Whisk the flour, sugar, cocoa and baking soda in a large bowl. 

In a glass, whisk the oil, vinegar, vanilla, and half a cup of water. Gradually add to dry ingredients.
Continue to mix until all ingredients are fully combined.

Dived into cupcake liners.


Directions for the cheesecake filling:
Beat together the cream cheese, sugar, egg, vanilla and salt on medium-slow until smooth and fluffy (or in my case, not at all).

Stir chocolate chips by hand.

Spoon a tablespoon of the filling into the cupcake liners.

Bake at 325 degrees for 20 minutes. A good indicator is when the cheesecake filling turns golden on the edges. Decorate with cream cheese frosting and cocoa powder.


Tuesday, 14 August 2012

A Final Goodbye To The Olympics

#instagrammeetsblogging

I would say the biggest blogging trend currently would be tumblr. Its a medium where anyone can blog and no original content is required to be successful and can therefore be more appealing to the masses. Tumblr for most people is "re-blogging" vintage looking photos taken by hipsters who now probably regret ever editing that photo because now of course its too "mainstream". And now that everyone can reblog these photos the next logical step is making a device available for the masses to take their own vintage photos a la instagram.

I've got to say I am a fan of the effects that instagram makes but I wasn't too convinced for a blog. I mean who wants their food to look old?! But after baking these toffee and olympic inspired cupcakes, when my friend took these photos on her iphone I postponed taking my own photos with my dslr and then when she posted them on facebook I decided against it all together. I thought the effect seemed perfect for saying goodbye to the Olympics (which are now in the past)!


See ya in Sochi!

Wednesday, 1 August 2012

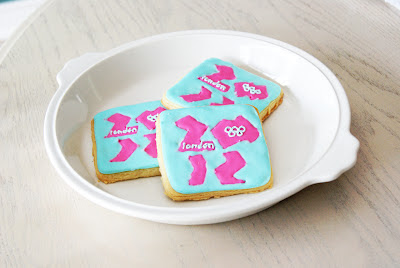
London 2012 Cookies

So the Olympics have finally started and despite Canada still not winning a gold medal yet I couldn't help celebrating the silver medal by the men's eight with my rower friend. And by celebrate I of course mean bake! 

These were definitely not my best cookies by any stretch of the imagination and the lines ended up being quite messy. I really need to work on flooding outside sharp corners but I've never made cookies with shapes as geometric as this, just nice, smooth, round corners so it was also a learning experience. But am I happy with them? Yes! There is just so much excitement in these Olympics that not even an ugly cookie could get me down!


Saturday, 21 July 2012

Chocolate Macarons: Take One


So finally I worked up the courage to attempt french macarons. The problem with macarons are that you have so many articles that will say certain details are crucial to the perfect macaron and others that say they don't matter at all. 
So I decided to take the advice of one of my favourite bloggers: http://cakejournal.com/tutorials/how-to-make-macarons/.
And here is the series of (unfortunate?) events that occurred in the process of trying to make chocolate macrons.

Things I don't own and probably should have owned in order to make these macarons:
-Food Processor
-Kitchen Scale
-Large Round Tip (I usually just use the large coupler and it works just fine...)

Step one of the recipe was to grind the almonds into a powder. My blender has a grind button so it seemed simple enough until the blender stopped working and started smoking. After this catastrophe I needed to convert the weight measurements to cups which was partially done for me except the conversions provided did not match the conversions I found on websites I normally used for this kind of thing. So which was right? I went with cake journal on the conversions.

The meringues went okay. They were not as glossy as described in the recipe but they were stiff enough not to move when I flipped the bowl upside down. The problem was the consistency after folding in the dry ingredients was off. I find I often have this problem with folding because I tend to over-mix to ensure that is mixed enough. So the mixture turned out too thin and dripped everywhere while I was trying to pipe it. I mean globs the size of your fist on the counter, the roll of parchment paper and all over my hands.


So there were more problems with this recipe than things that went right so when I got 3 macarons out of the recipe I was kind of ecstatic! (Did I mention when making the the ganache the cream boiled over too?!) So next time I bake I need make sure to avoid ladders and black cats. Also I need to buy a couple things...


Sunday, 15 July 2012

Coconut and Pineapple Cupcakes


Since I've started working its been both hard to find the time to find something I want to bake as well as being able to organize the ingredients. But finally I had a whole weekend off! So I decided I would bake. I'd been eager to try and make french macarons but I'd been postponing it for a while (and I decided to do it again). Instead I decided to have something more refreshing since its become so hot and humid lately. 

About a month ago I bought the Hummingbird Bakery Cookbook and a recipe that had caught my eye was the coconut and pineapple cupcakes which reminded me and pina coladas and vacations. On the cover of the cookbook they have them decorated with shaved coconut and a small gumpaste rose and I thought they were adorable.


Coconut and Pineapple Cupcakes (makes "12", I got 10, from the Hummingbird Bakery Cookbook)

Ingredients:
1 cup all-purpose flour
3/4 cup sugar
1 1/2 teaspoons baking powder
a pinch of salt
3 tablespoons unsalted butter
1/2 cup coconut milk (I used unsweetened)
1/2 teaspoon vanilla extract
1 egg
9 canned pineapple rings chopped into small pieces (we didn't use canned pineapple and used about a third of a pineapple)
shaved coconut for decoration


Directions:
Preheat oven to 325.

Mix flour, sugar, baking powder, salt and butter in a mixer on slow until a sandy consistency is reached and the butter is no longer visible.

Mix coconut milk and vanilla together in a separate bowl and add to flour mixture, mixing on medium speed.

Add an egg and beat until fully combined, scraping the sides of the bowl with a spatula.

Divide the chopped pineapple into the fluted paper cups and add batter until 3/4 full. Bake for 20-25 minutes. I baked for about 30 (my oven usually takes longer) but found they still looked soft and "not ready" when I took them out however after cooling they lost that consistency. Then let cool on a wire rack.

For the frosting mix 2 cups of confectioners' sugar and 5 tablespoons of unsalted butter until combined  with the appearance of icing consistency. Slow the speed and add two tablespoons of coconut milk. Continue to beat, increasing the speed, until light and fluffy.


Sunday, 24 June 2012

My Birthday Cake


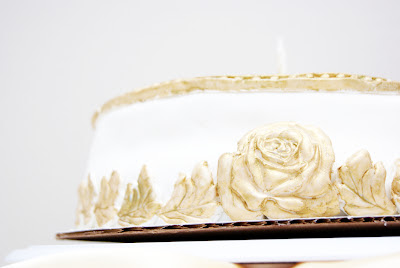
The long wait to make another cake with fondant was finally over! For my birthday my mother bought all my supplies to make my own birthday cake, which I'd never had the chance to do before. I wanted to keep it as simple as possible to minimize error. But like always there were things I should have done differently. The lopsided cake didn't help either! One layer of the cake did not come out of the pan cleanly (I've learned my lesson with Pam) which resulted with improv correction tricks using plastic wrap and icing to try and re-balance the layer.
Was it successful? Not really. Did the extra icing make it too mushy and round for the fondant? Yup. But was I excited to just make my own cake and was everyone impressed? Double yes.